How to host a static website on Amazon’s AWS with SSL using S3, Certificate Manager, CloudFront, and Route53

So you have a static website and need to host it somewhere, there are many places to host your site but since you also want your site to have a security certificate, and you want all of this at a reasonable price, your options are limited.
Last year, I tried Azure Storage to host a static website, but at the time, the options to get and apply a security certificate to a site hosted on Azure storage was complicated, it was very confusing.
This time I decided to give AWS a try, and it turns out, hosting a static website using AWS’s S3 storage service works really well for static websites.
AWS also has a somewhat simple way to set up your new static website with a free security certificate. Below I will show you the steps to accomplish this.
These are the services you’ll need to configure to host your static website and an SSL certificate with Amazon’s AWS:
- S3
- CloudFront
- Certificate Manager
- Route53
The instructions below assume that you’ve already signed up for a AWS account.
S3 – Create and change the properties of your static website bucket
After you login to your AWS Console, search for S3 and create a new bucket for your static website. When creating the new bucket, you only need to give it a unique name, and then uncheck the Block all public access options under permissions. Don’t change any of the other default values or options.
Properties tab
After you’ve created a new bucket to hold your website files, click on the bucket name and then on the properties tab. From here, select the Static Website Hosting, it should look like the screenshot below.
In this window, you want to put the name of your main page (i.e. index.html), an optional error page, and any redirection rules, also optional.

Before you move on to the next step, copy the Endpoint value from the Static website hosting window and save it, you’ll need it for the CloudFront Distribution section below. In the example above, the endpoint is the URL: http://solopractica.s3-website-us-west-2.amazonaws.com
Permissions tab
Make sure the Block all public access option is unchecked. Now go to the Bucket Policy option and click on Policy Generator.
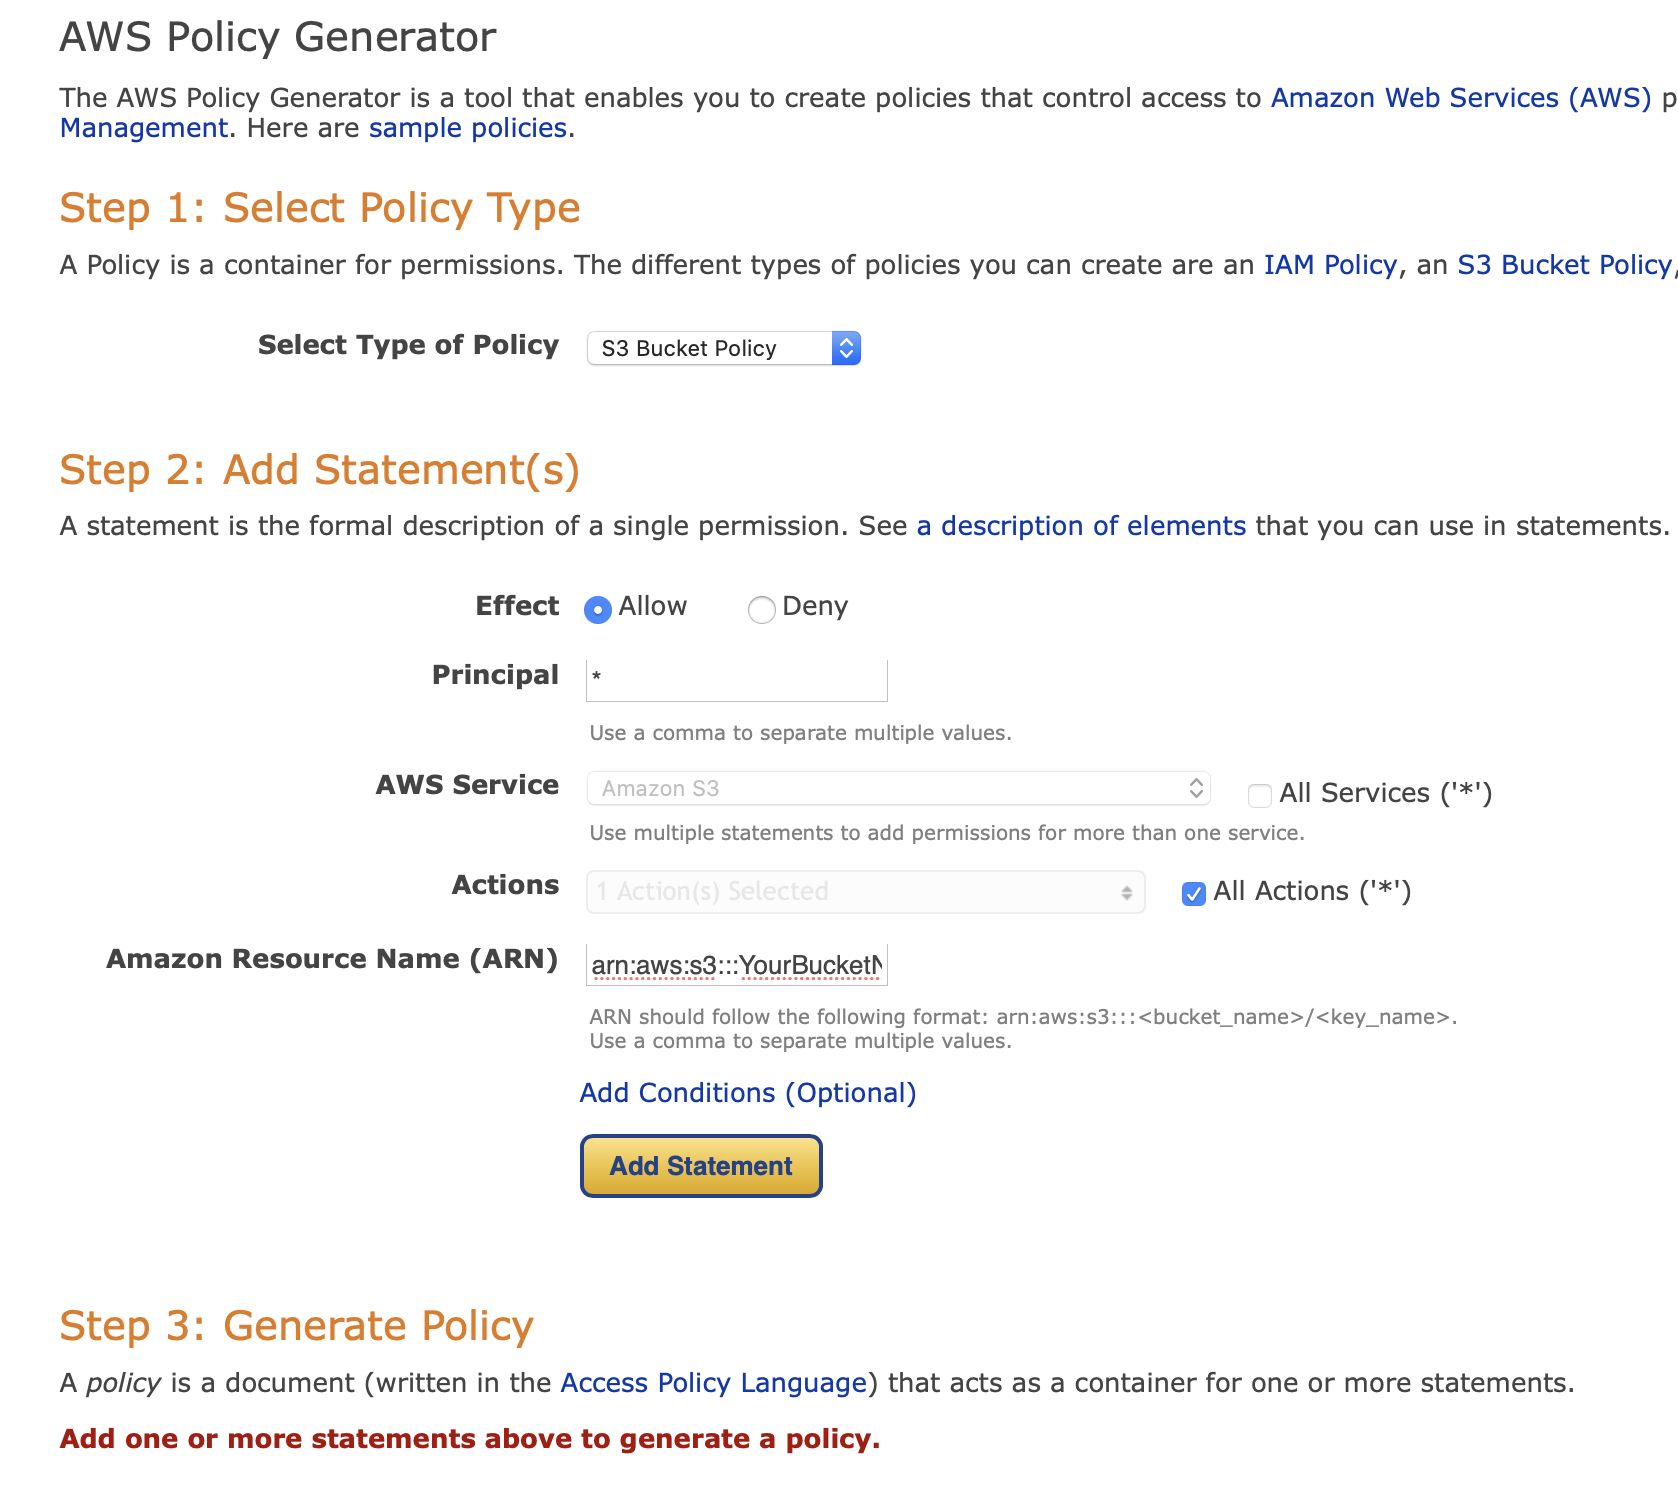
Select the options as shown above, make sure the Amazon Resource Name (ARN) follows this format: arn:aws:s3:::YourBucketName/* and replace YourBucketName with the actual name of your newly created bucket.
Finally, click on Add Statement and then Generate Policy, a new window will open with your new bucket policy in JSON format. Copy the JSON document, and paste it into the Bucket Policy space back in the bucket properties page.

If you get the following error message after saving the new policy: Policy has invalid resource, make sure the bucket name value is correct, and save again.
You’ll see a warning informing you that your bucket has public access, that is fine, the bucket needs public access to host your static website.
CloudFront Distribution – Create and configure
A CloudFront distribution is required if you want to host a static site and distribute media files using HTTP or HTTPS.
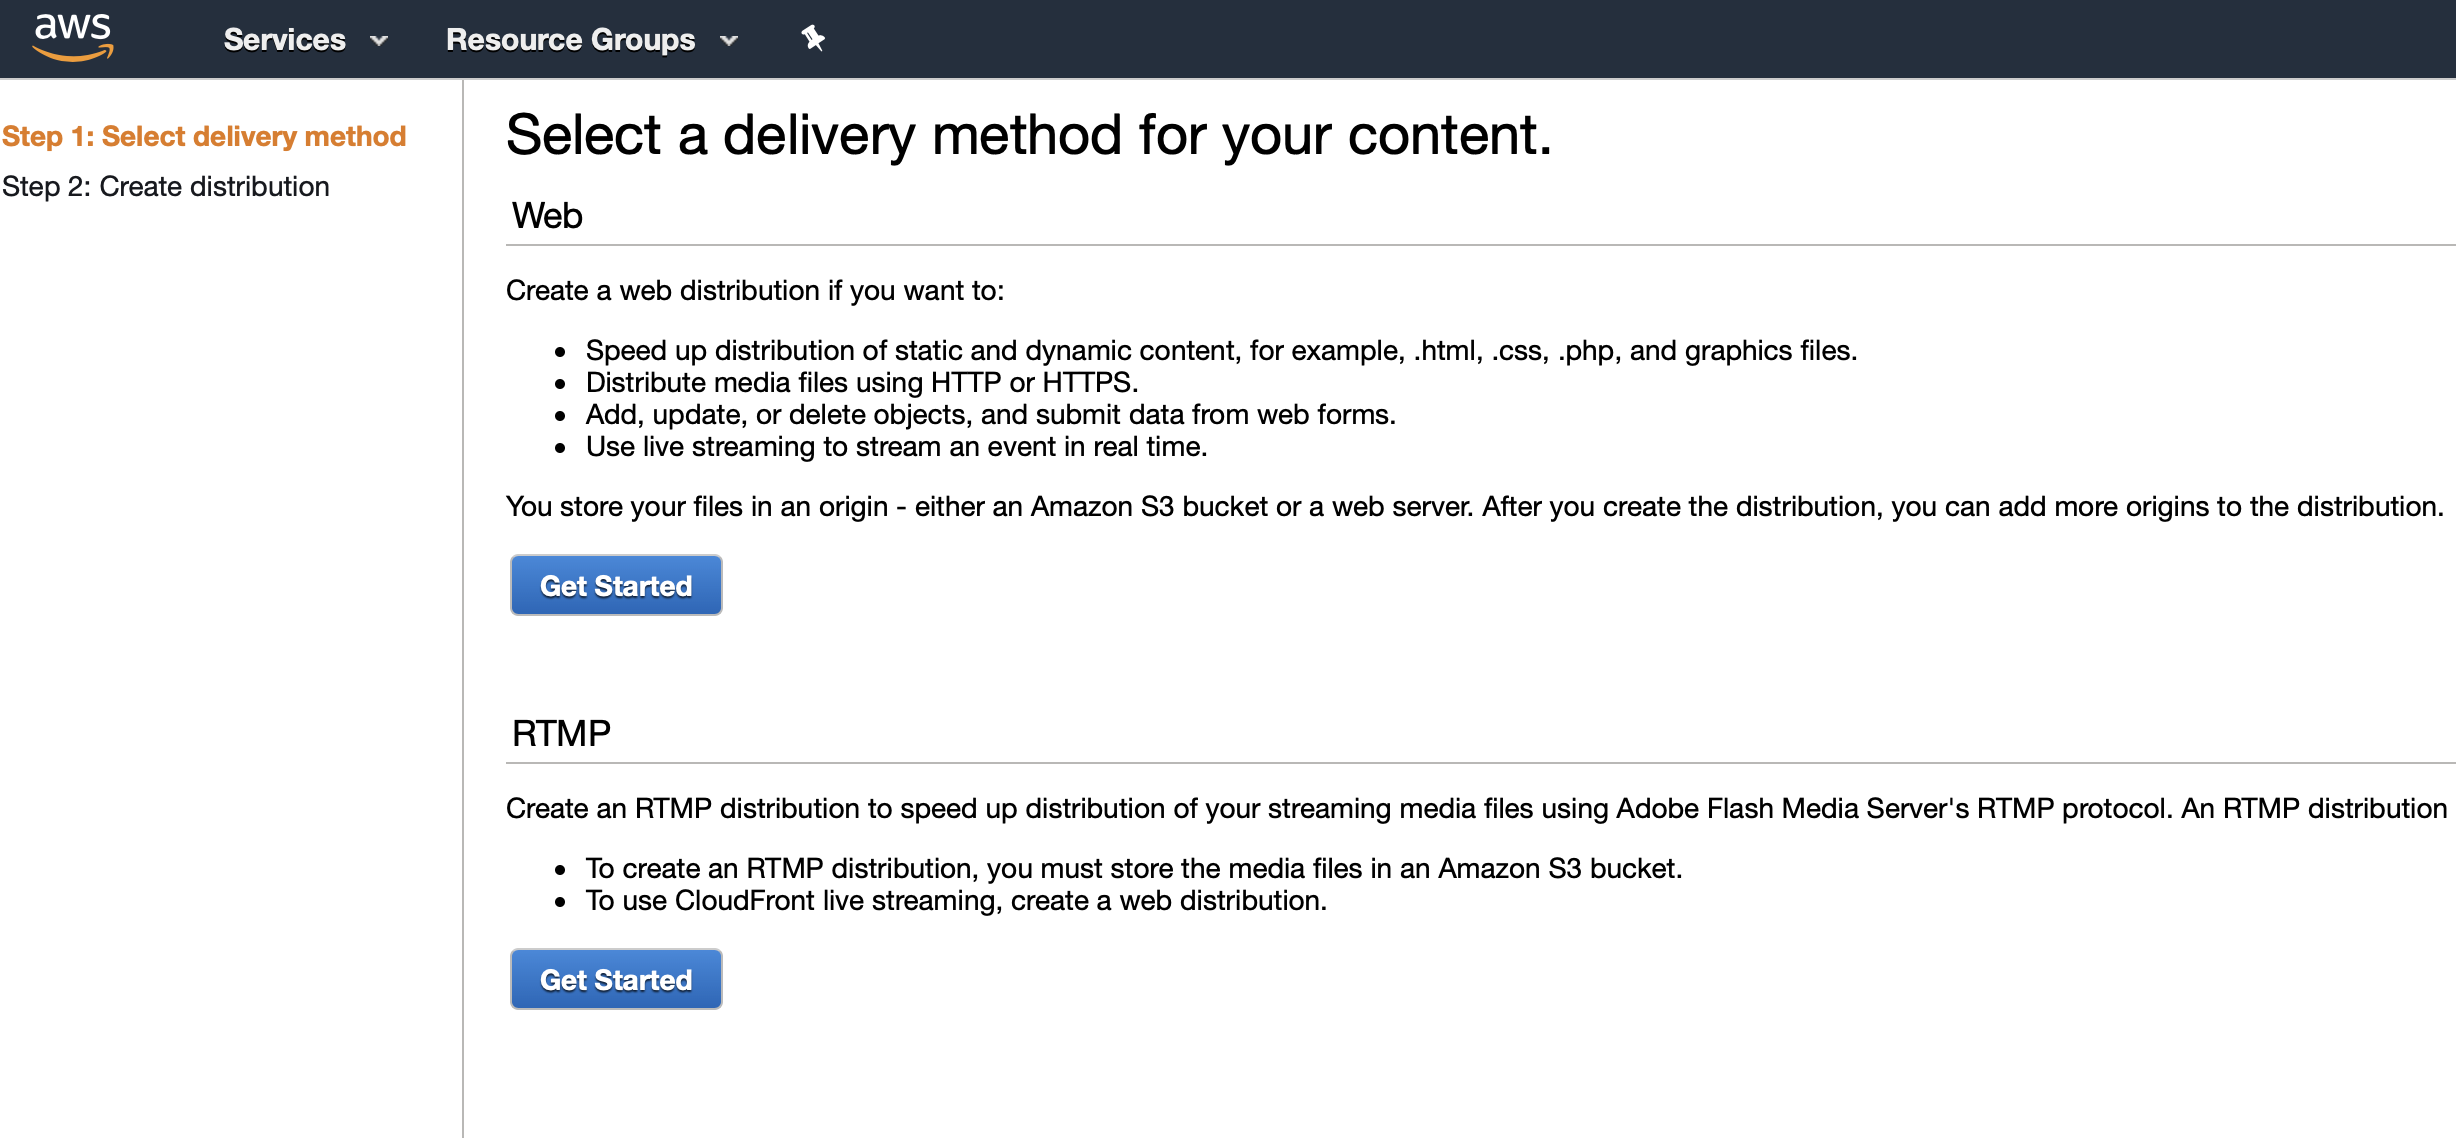
To create a CloudFront distribution, go to the AWS console, and type CloudFront in the search box. When the CloudFront Service page opens, click on Create Distribution, and then select Get Started for the Web option.
CloudFront distribution properties
Do not be overwhelmed by the many options in this window, you only need to change a few of these properties. Below are basic instructions on how to fill out the Create Distribution form.
Origin Settings
- Origin Domain Name: Select your bucket endpoint from this list.
- Origin Path: Leave it blank.
- Origin ID: It gets filled automatically when you select the origin domain name above.
- Restrict Bucket Access: No.
- Origin Custom Headers: Leave default/blank values.
Default Cache Behavior Settings
- Path Pattern: Nothing to change here.
- Viewer Protocol Policy: Redirect HTTP to HTTPS (but you can select any option, it is up to you).
- Allowed HTTP Methods: GET, HEAD.
- Field-level Encryption Config: Leave default/blank value.
- Cached HTTP Methods: Leave default value.
- Cache Based on Selected Request Headers: None.
- Object Caching: Use Origin Cache Headers.
- Minimum TTL: Leave default.
- Maximum TTL: Leave default.
- Default TTL: Leave default.
- Forward Cookies: None.
- Query String Forwarding and Caching: None.
- Smooth Streaming: No.
- Restrict Viewer Access: No.
- Compress Objects Automatically: No.
- Lambda Function Associations: Leave default/blank value.
Distribution Settings
- Price Class: Use Only U.S., Canada and Europe (the cost of it will change based on what you select here. Click on the information icon next to this setting and make the right choice for you).
- AWS WAF Web ACL: None.
- Alternate Domain Names (CNAMEs): Type your domain name and any subdomains you have for the bucket hosting your static website. For example, for my site solopractica.com, I entered the following values here:
solopractica.com
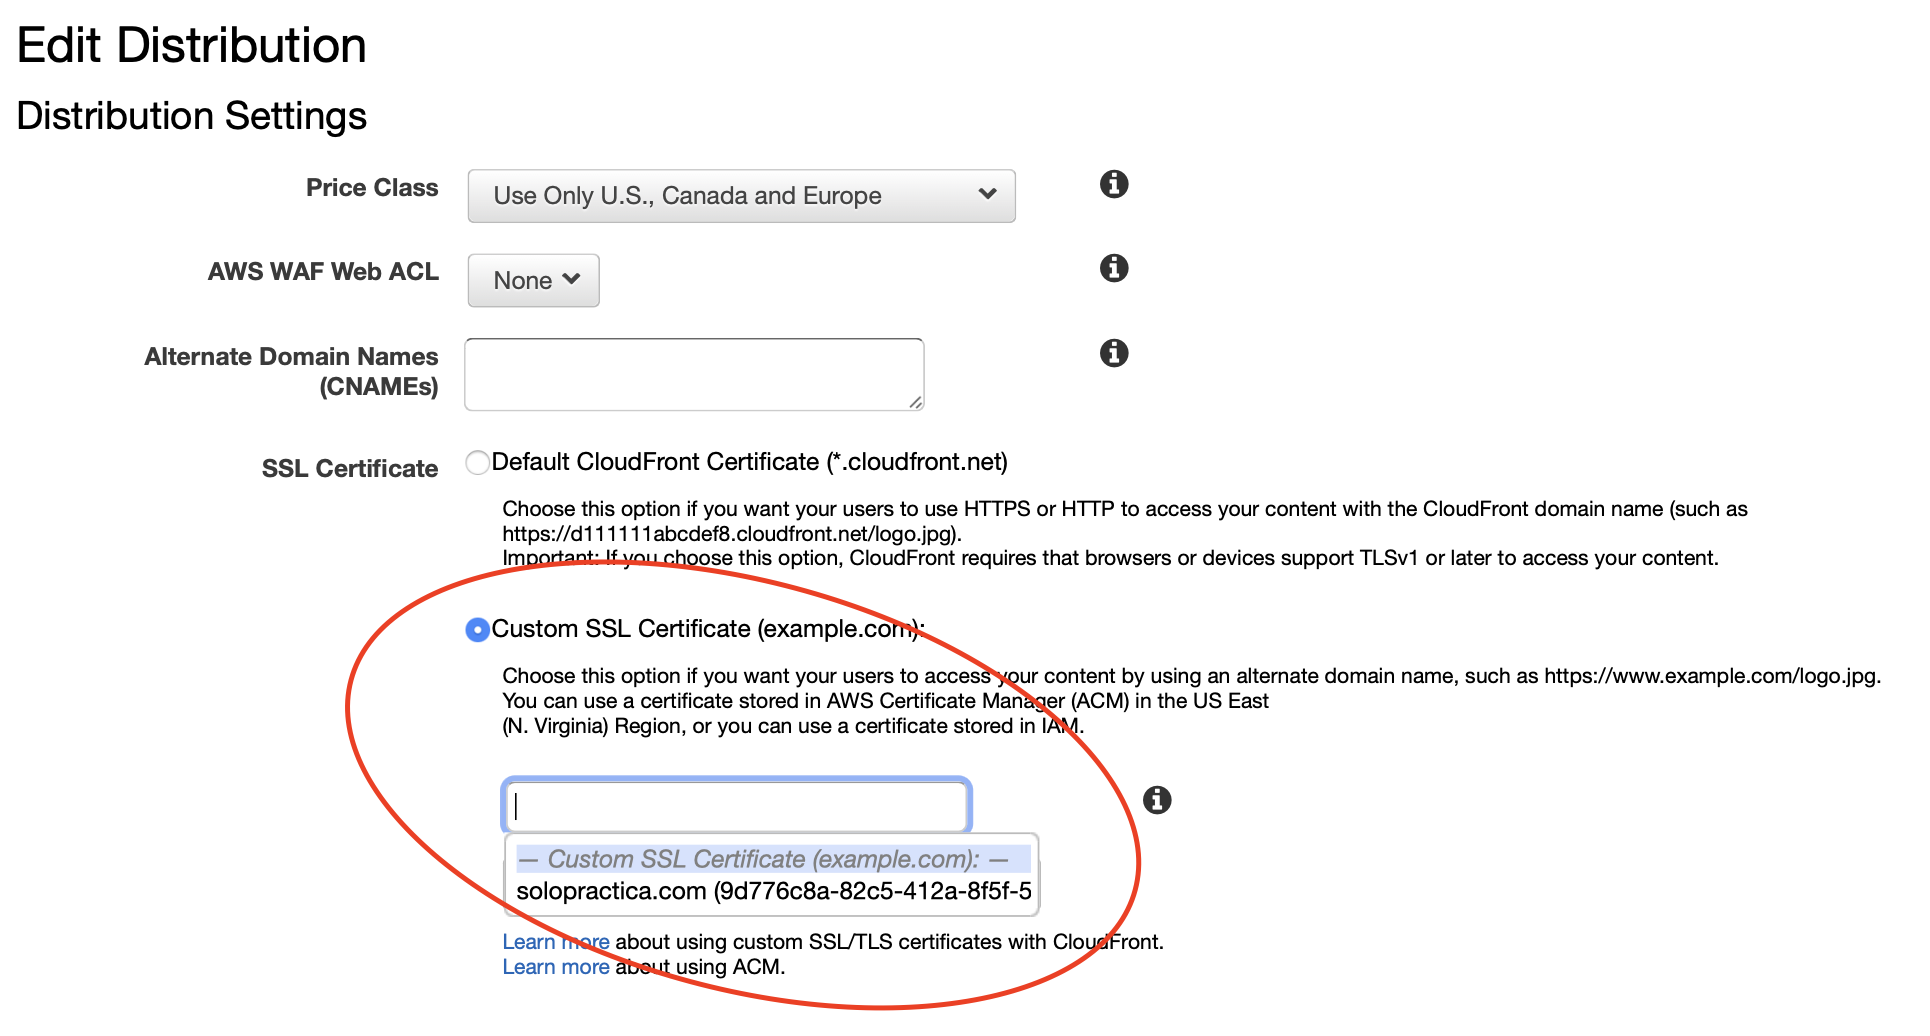
www.solopractica.com - SSL Certificate: Custom SSL Certificate. This is where you’ll also be clicking on Request or Import a Certificate with ACM (see section below).
- Supported HTTP Versions: HTTP/2, HTTP/1.1, HTTP/1.0
- Logging: Off
- Enable IPv6: Checked.
- Distribution State: Enabled.
After you request a SSL certificate and complete all of the options, click on Create Distribution.
Certificate Manager – Request a Certificate
From the steps above, open up the window to request a new certificate by clicking on Request or Import a Certificate with ACM.
In this page, type your domain name and www version of it and then click Next. Example:
- ricardodsanchez.com
- www.ricardodsanchez.com
Select validation method
Choose the DNS validation option, it’s the fastest and easiest. If you don’t have access to your domain DNS settings, then you can try Email validation instead. Click Review, and then Confirm and request.
Validation
Once you go through the steps to validate your domain(s), you’ll see a window with your Request in progress and the instructions to add a CNAME record to the DNS configuration for your domain. Click Continue.
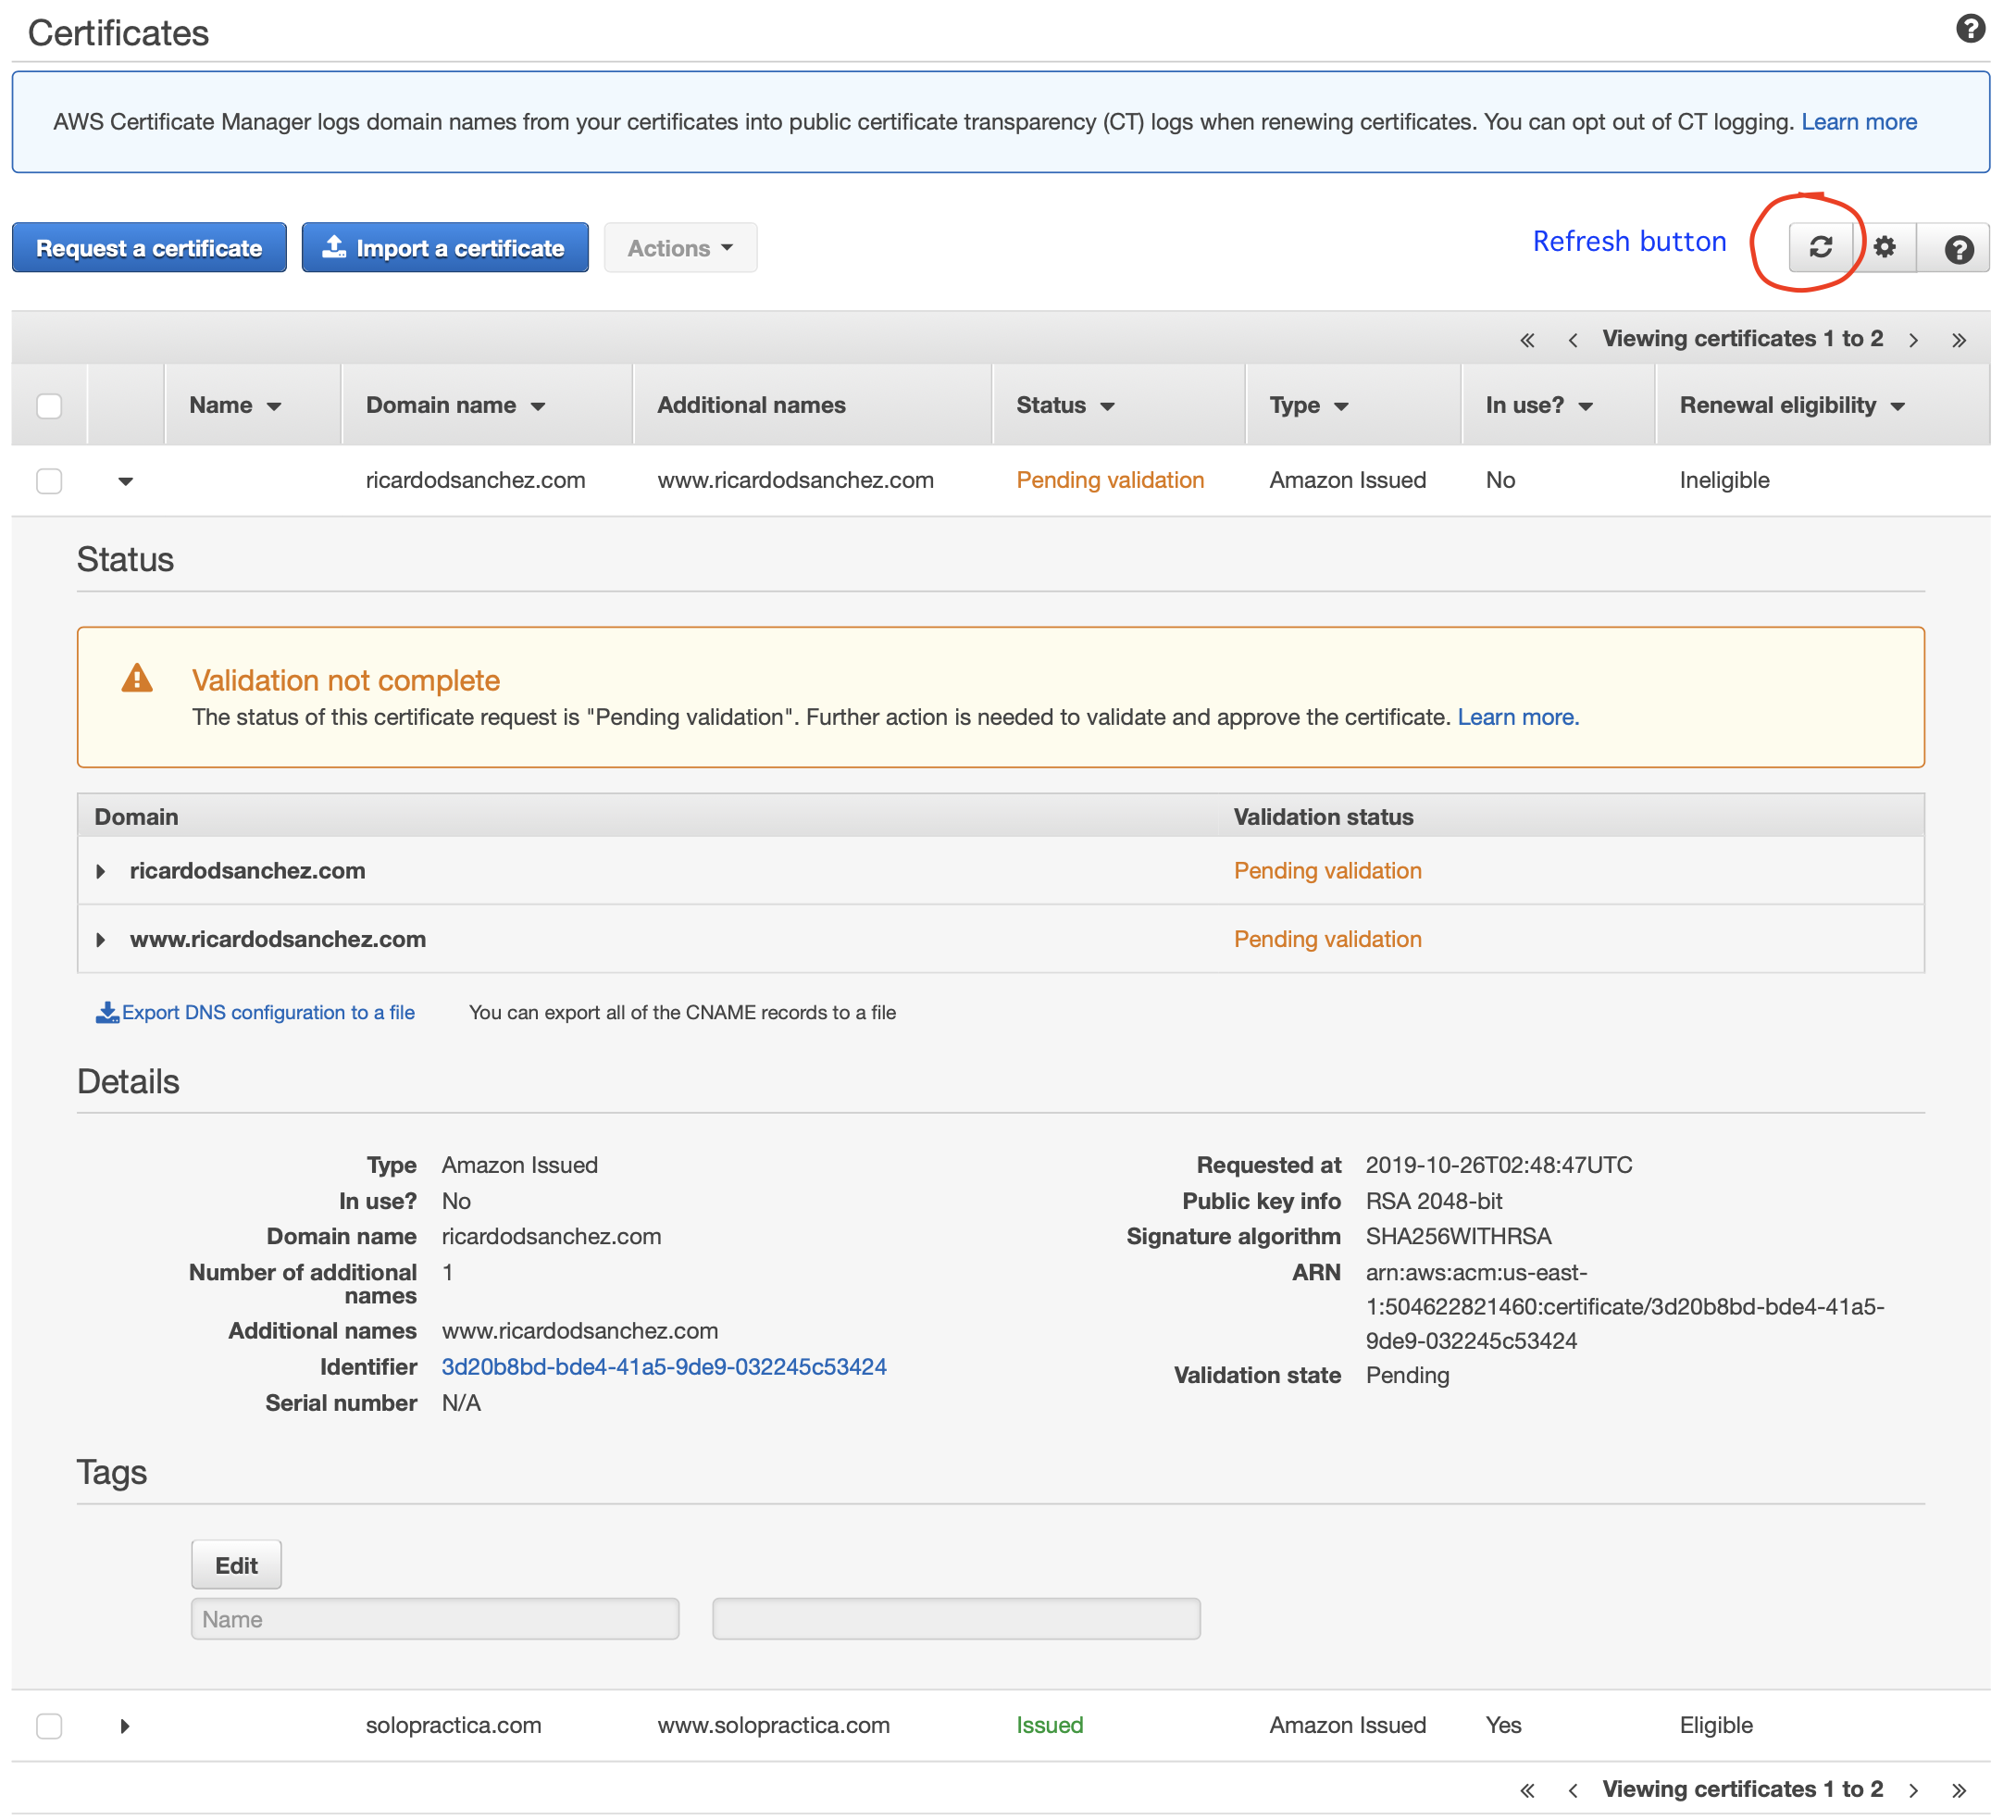
Certificates
This page will show the status of your certificate request, you can refresh the status of your request to get the status updated. The time to get your domain verified depends in part, on your domain registrar.
After your certificate has been approved, go back to your Distribution and click on it to edit it. From the edit page, make sure you have the Custom SSL Certificate option selected and then select your brand new SSL certificate from the list.
Route 53 – Create and configure
This is the last step, it will allow AWS to route your domain name and certificate to the appropriate resource.
Go to the AWS console and type Route 53 in the search box, click on the Route 53 link, and then on Hosted zones.
Hosted zones
Create a new hosted zone, enter your domain name, make sure the Public Hosted Zone is selected and click Create.
Record Sets
Two record sets are created by default when creating a new zone, a NS (Name Server), and SOA (Start of authority).
While selecting the newly created Hosted Zone, click on Create Record Set.
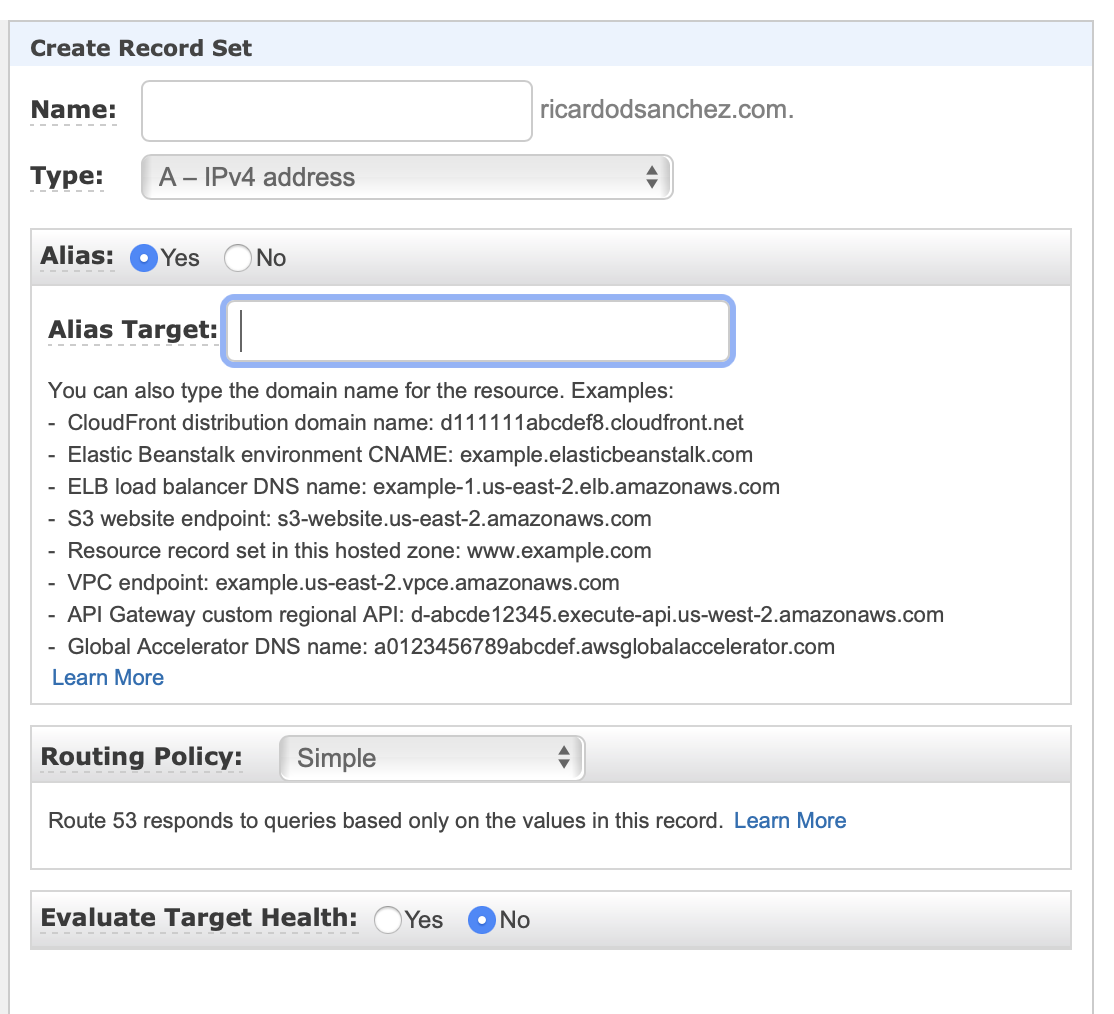
Use the following settings and values when creating the new record set:
- Name: Leave the name box empty.
- Type: A – IPv4 address.
- Alias: Yes.
- Alias Target: Select it from the list, you should see a value available if all of the steps above were completed successfully.
- Routing Policy: Simple.
- Evaluate Target Health: No.
After this, you can add another record set of type A for any additional domain names you might be using, for example, www.yourdomain.com.
That’s it, by now you should be able to open your browser and go to your domain, it should be available with the https protocol.
Cheers!